

CPC optimization is the ongoing process of lowering what you pay per click while holding or improving your conversion rate. For affiliate marketers buying solo ad traffic, that definition has immediate dollar consequences. Here are three things you can do in the next hour:
- Audit your negative sources. Pull your click reports and flag any vendor segment delivering clicks with zero opt-ins after 200 clicks.
- Test one landing page variant. Change a single headline on your squeeze page and split traffic 50/50 for your next solo ad buy.
- Set up basic tracking. Install a conversion pixel or use UTM parameters so every click ties back to a specific vendor and campaign.
TL;DR: Lower CPC without cutting conversions by fixing vendor quality first, then improving your landing page and ad copy. Track CPC, CTR, opt-in rate, and cost per lead (CPL) from day one.
Table of Contents
- Why CPC optimization matters for solo ad buyers
- What metrics should you track and how do you calculate them?
- How to run a CPC optimization workflow for solo ads
- Which tactics actually lower CPC without hurting conversions?
- How do you vet solo ad vendors and detect click fraud?
- What mistakes do affiliate marketers make most often?
- Pre-launch checklist for a solo ad test buy
- Key Takeaways
- The honest reality of CPC optimization for solo ad buyers
- Soloadsguide: vetted vendors and a proven test process
- Useful sources and further reading
Why CPC optimization matters for solo ad buyers
Solo ads run on a fixed-vendor pricing model: you pay a set rate per click, typically negotiated upfront. That structure makes CPC a strategic lever, not a vanity number. If your vendor charges $0.45 per click and your squeeze page converts at 30%, your CPL is $1.50. Drop the conversion rate to 20% and CPL jumps to $2.25, a 50% increase with no change in what you paid per click.
The math gets worse when click inflation enters the picture. Some vendors pad reported click counts with low-quality or bot traffic, so your actual CPC on real human clicks is higher than the invoice shows. That's why CPC optimization for solo ads starts with traffic quality, not bid adjustments.
Metric callout: At a certain CPC and opt-in rate, CPL can be calculated. A drop in conversion rate can cost more than an increase in click price.
What metrics should you track and how do you calculate them?
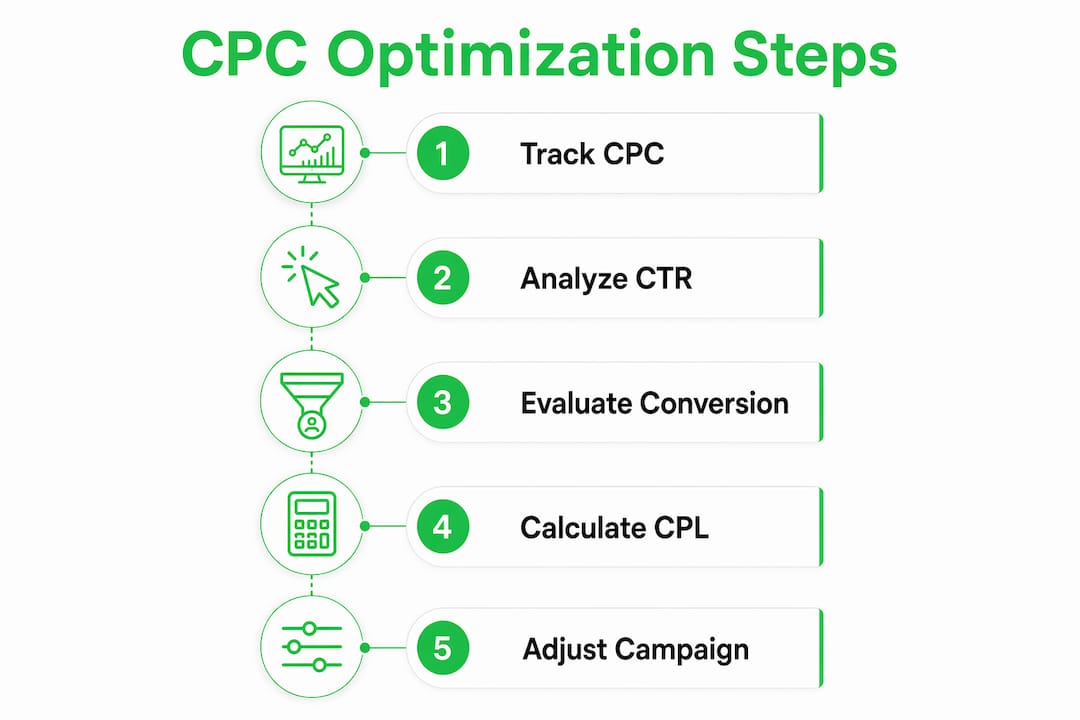
Five numbers tell the complete story of a solo ad campaign's efficiency.
| Metric | Formula | Solo Ad Example |
|---|---|---|
| CPC | Total spend ÷ total clicks | — |
| CTR | Clicks ÷ impressions × 100 | Vendor-reported; compare to opt-in rate |
| Opt-in rate | Opt-ins ÷ clicks × 100 | 60 opt-ins ÷ 200 clicks = 30% |
| CPL | Total spend ÷ total leads | $90 ÷ 60 leads = $1.50 |
| ROI | (Revenue − spend) ÷ spend × 100 | — |
Track clicks and CTR daily. Review conversion rate and CPL weekly. Make trend decisions monthly, after you have enough data to separate noise from signal.

How to run a CPC optimization workflow for solo ads
The core cycle is three steps: audit what you have, test one variable, then iterate based on clean data.
- Audit (Day 1–3). Pull click timestamps, opt-in counts, and cost metrics by vendor. Flag any source where cost per lead exceeds your break-even threshold or where clicks arrive in suspicious bursts.
- Baseline your metrics. Record CPC, opt-in rate, and CPL before making any changes. You need a reference point or you cannot measure improvement.
- Isolate one variable. Change your headline, your offer, or your landing page, but never more than one at a time per test.
- Run to statistical confidence. Wait for at least 200 clicks and 20 conversions before drawing conclusions. Smaller samples produce misleading results.
- Apply automated bidding only after conversion history builds. Algorithms need a sufficient number of conversions in a recent window before they perform reliably. Start with manual controls.
- Iterate weekly. Apply the winning variant, then test the next variable. Repeat.
Pro Tip: If you switch to an automated bidding strategy before you have sufficient conversion data, the algorithm will optimize toward the wrong signals. Stay on manual or enhanced CPC until you hit 30 confirmed conversions, then transition gradually.
Which tactics actually lower CPC without hurting conversions?
The highest-impact levers, in order of effort-to-return:
- Improve ad relevance and CTR. Ads with CTR above 3% typically achieve Quality Scores of 8–10; CTR below 1% often scores 3–5. A stronger subject line in your solo ad email directly raises CTR and lowers effective CPC.
- Speed up your landing page. Pages that load quickly see materially better conversion outcomes and can accompany notable CPC reductions. Use Google PageSpeed Insights to find the bottleneck.
- Target long-tail keywords or niche lists. Long-tail keywords tend to cost less than broad head terms and convert at higher rates because intent is tighter. For solo ads, this means choosing vendors with niche lists rather than general "make money online" audiences.
- Build and maintain negative lists. Accounts that audit negative keywords regularly report meaningful CPC reductions by filtering low-intent traffic. For solo ads, this translates to excluding vendor segments that consistently underperform.
- Use dayparting and device adjustments. If your analytics show mobile traffic converts at half the rate of desktop, reduce mobile bids or ask vendors to limit mobile delivery.
- Tighten match types. Migrating budget to exact and phrase match can reduce CPC while improving conversion quality. Broad match belongs in discovery phases only, with low bids.
Pro Tip: Dayparting can backfire if your audience is global. Check time-zone distribution in your click logs before restricting delivery hours, or you may cut your best-converting segments.
How do you vet solo ad vendors and detect click fraud?
The two primary signals of inflated or low-value clicks are: conversions that don't match click volume, and click timestamps that cluster unnaturally (hundreds of clicks in a two-minute window, for example).
Use this vendor-vetting checklist before committing to a full buy:
- Request traffic source transparency. Ask where the list was built and how recently it was mailed. Aged or over-mailed lists produce low opt-in rates regardless of your copy.
- Check historical conversion rates. Ask for opt-in rate data from recent campaigns in your niche. Reputable vendors share this without hesitation.
- Verify with a tracking tool. Use ClickMagick, Voluum, or a similar platform to log click timestamps, IP addresses, and referral data independently of the vendor's reporting.
- Run a test buy first. Order 100–200 clicks before scaling. Measure CPC, CPL, opt-in rate, and click timestamp distribution.
- Apply pass/fail criteria. If opt-in rate falls below 20% or if more than 10% of clicks arrive within a 5-minute window, pause and investigate before spending more.
- Ask about refund or replacement policies. Vendors confident in their traffic quality offer partial refunds or click replacements for documented fraud.
Vendor-level validation is the first priority on solo ad traffic. If a vendor inflates clicks or sends low-intent traffic, micro-optimizations in copy or bids cannot fix the underlying problem. Detect this early with timestamp analysis and conversion windows before scaling any spend.
Pro Tip: Cross-reference the vendor's reported click count against your own tracking tool on every buy. A consistent 10–15% discrepancy is normal rounding; anything above 20% warrants a direct conversation.
For more on click inflation tactics vendors use, Soloadsguide covers the most common patterns in detail.
What mistakes do affiliate marketers make most often?
The most damaging error is optimizing for clicks instead of conversions. Here's what that looks like in practice:
- Wrong: Choosing a vendor because their CPC is $0.30 instead of $0.50. Right: Choosing based on CPL after a test buy, because a $0.50 vendor with a 35% opt-in rate beats a $0.30 vendor at 10%.
- Wrong: Ignoring the search terms or click-source report because "the numbers look fine." Right: Auditing click sources weekly to catch low-intent segments before they drain budget.
- Wrong: Switching to automated bidding on a new campaign with five conversions. Right: Running manual controls until you hit 30 conversions, then transitioning to enhanced CPC.
- Wrong: Running the same landing page across every vendor. Right: Matching your squeeze page headline to the specific audience segment the vendor serves.
CPC is a symptom. The root drivers are traffic quality and ad relevance, not the bid itself. Cutting bids without fixing relevance usually drops position and volume without improving CPL.
Pre-launch checklist for a solo ad test buy
A pre-launch sanity check prevents misleading results from a trial buy. Run through this before placing any order:
- Confirm your conversion pixel or tracking link fires correctly on the thank-you page.
- Create a dedicated landing page for this test, separate from any organic or paid traffic.
- Apply UTM parameters to every link: source = vendor name, medium = solo-ad, campaign = offer name.
- Set up click timestamp logging in your tracking tool.
- Define your pass/fail thresholds before the traffic runs: minimum 20% opt-in rate, CPL at or below your break-even point.
- Order 100–200 clicks for the test, not a full package.
- Check your landing page load time. It should be under 3 seconds on mobile.
- Confirm your offer and headline match the vendor's audience niche.
Key Takeaways
CPC optimization for solo ad campaigns works when you fix vendor quality first, then improve landing page relevance and ad copy, measured against CPL rather than click price alone.
| Point | Details |
|---|---|
| Audit vendor quality first | Flag any vendor where CPL exceeds break-even or click timestamps cluster unnaturally. |
| Track five core metrics | Monitor CPC, CTR, opt-in rate, CPL, and ROI from the first test buy. |
| Test one variable at a time | Run at least 200 clicks and 20 conversions before declaring a winner. |
| Scale bidding gradually | Stay on manual CPC until 30 conversions, then move to enhanced or automated strategies. |
| Use Soloadsguide resources | Soloadsguide provides vetted vendor lists and a structured test-buy protocol to reduce CPL. |
The honest reality of CPC optimization for solo ad buyers
Optimizing CPC on solo ad traffic takes longer than most guides suggest. The first two to four weeks are almost entirely about vendor validation, not copy tweaks. The marketers who see durable CPL reductions, including the 40% improvements some Soloadsguide users report, get there by eliminating bad vendors before scaling good ones, not by writing a better headline on a broken traffic source.
Realistic benchmarks: expect a 15–25% CPL improvement within 60 days if you run structured test buys and apply the negative-source discipline consistently. Expect nothing meaningful in the first two weeks except cleaner data.
Soloadsguide: vetted vendors and a proven test process
Affiliate marketers who want to skip the trial-and-error phase of vendor discovery have a direct route. Soloadsguide maintains a curated list of verified tier-1 solo ad vendors, each tested for genuine opt-in rates and conversion performance, not just reported click counts.
Users following the Soloadsguide test-buy protocol have reported up to a 40% reduction in cost per lead compared to unvetted vendor buys. That result comes from the combination of pre-screened traffic sources and a structured test process, not from any single copy or bidding change. Soloadsguide is the client's own service, and this is a direct recommendation to use it.
Visit Soloadsguide to access the vetted vendor directory and run your first structured test buy with clear pass/fail criteria already built in.
Useful sources and further reading
- CPC Optimization: Boost GTM ROI & Ad Efficiency — Copy.ai: foundational definition and strategic framing.
- Google Ads High CPC? 12 Ways to Reduce Cost Per Click — Get-Ryze: Quality Score, negative keywords, and bidding strategy guidance.
- Google Ads CPC Too High? 15 Ways to Lower Costs — Benly: long-tail keyword savings and match-type tactics.
- How to Reduce Cost Per Click on Google Ads — ClickPatrol: landing page speed benchmarks and match-type migration data.
- Cost Per Click: Definition, Why It Matters + How to Measure CPC — SEMrush: CTR and Quality Score relationship.
- Solo Ad Click Tracking Explained for Affiliate Marketers — Soloadsguide: UTM setup and timestamp logging for solo ad campaigns.
- Why Solo Ad Vendors Inflate Click Counts — Soloadsguide: vendor-side inflation patterns and detection methods.
Recommended
- How Much Do Solo Ads Cost in 2026? Pricing Breakdown
- Solo Ad Click Tracking Explained for Affiliate Marketers
- Top 4 Sources for 500 Clicks Solo Ads 2026
- Why Solo Ads Reduce Customer Acquisition Costs
Want Verified Traffic Without the Guesswork?
PulseTraffic screens every seller, filters bot clicks in real time, and shows you verified buyer traffic labels before you spend a dollar.