

Your solo ad analytics dashboard must independently record unique clicks, timestamped redirects, opt-in conversions, geo/IP/ASN context, and a fraud score. Build those five elements first and you can verify vendor delivery within a single test order.
Your minimum dashboard checklist:
- Independent unique click count (your tracker, not the vendor's)
- Click timestamps and delivery pacing chart
- Conversion postbacks with transaction IDs tied to sub-IDs
- IP, geo, and ASN enrichment per click
- Bot/fraud score (filtered vs. raw click delta)
- Opt-in rate tagged by vendor sub-ID
Three steps to get there fast:
- Create a tracking subdomain you control and generate a campaign link with bot filtering on and a unique sub-ID for each vendor
- Send that link to the vendor with clear instructions to use it exactly as provided
- Capture opt-in conversions via postback or UTM tags and compare your numbers to the vendor's within 24–48 hours
Acceptable variance and red flags: A 5–10% gap between vendor-reported clicks and your tracker is normal. Vendor-reported numbers typically run 5–15% higher than independently tracked human-verified clicks. A large gap, a high share of bot-filtered clicks, or a significant portion of data-center ASNs are serious red flags that warrant a dispute before you pay.
Table of Contents
- What accounts and tools do you need before setup?
- How do you set up the tracking domain, campaign link, and conversion wiring?
- Which dashboard widgets actually tell you something useful?
- How do you verify delivery and spot fraud in real time?
- How does the 21-question framework map to your dashboard?
- US privacy and data-handling basics for click tracking
- Key Takeaways
- Why most buyers set up tracking too late
- Soloadsguide resources to put this into practice
- Useful sources
What accounts and tools do you need before setup?
Delays happen when buyers start building a tracker campaign and realize they are missing a domain or an autoresponder integration. Provision everything below before touching the tracker interface.
| Item | Purpose | Cost range | Setup time |
|---|---|---|---|
| Tracking domain (subdomain) | Prevents vendor tampering; improves deliverability | Free if you own a domain | 10–15 min (DNS propagation: up to 24 hrs) |
| Click tracker (ClickMagick, RedTrack, or Voluum) | Records unique clicks, sub-IDs, bot scores, and postbacks | monthly cost varies depending on tier | 30–60 min |
| Autoresponder with tag/UTM support | Tags opt-ins by source for conversion attribution | Varies by provider | 15 min |
| Spreadsheet or campaign log | Tracks vendor, vendor clicks, tracker clicks, opt-ins, 30-day revenue | Free | 5 min |
| Alert channel (email or Slack) | Notifies you of anomalous click spikes in real time | Free | 10 min |
Purpose-built trackers like ClickMagick, RedTrack, and Voluum handle bot filtering, sub-ID routing, and postback wiring in one interface. A lighter workflow using a basic redirect tool plus Google Analytics is possible for very small budgets, but you lose bot filtering and ASN data, which are the two signals that matter most for fraud detection.
Pro Tip: Register your tracking subdomain on a domain the vendor has never seen. Using go.yourdomain.com on a domain tied to your brand keeps the redirect path clean and prevents a vendor from recognizing and bypassing your tracker.
How do you set up the tracking domain, campaign link, and conversion wiring?
Follow this sequence exactly. Skipping steps or reordering them is the most common cause of broken postbacks and missing sub-IDs.
-
Point a tracking subdomain in DNS. Create a CNAME record for
go.yourdomain.compointing to your tracker's domain. In your tracker's settings, add that subdomain as a custom tracking domain. Wait for DNS propagation before creating campaign links. -
Create a tracker campaign with these settings: bot filtering ON, sub-ID field enabled (label it
s1orvid), redirect type set to 302 (not 301), and "append query string to destination" enabled. Set the destination to your squeeze page URL with UTMs appended, for example:https://yoursqueezepage.com/?utm_source=soloads&utm_medium=email&utm_campaign=vendor1&s1={subid}. The{subid}token passes the vendor's sub-ID value through to your autoresponder. -
Send the tracker link to the vendor. Provide the full URL including the sub-ID token. Instruct the vendor in writing to use the link exactly as provided and not to shorten or modify it. Keep a copy of the original link for your own test click.
-
Wire conversions. In your autoresponder or landing page builder, add a hidden field that captures the
s1query parameter and stores it as a subscriber tag. Then configure a conversion postback URL in your tracker pointing to your autoresponder's webhook endpoint. Every opt-in should fire a postback that records a transaction ID tied to the sub-ID. This is what lets you match opt-ins back to specific vendors in your dashboard. Solo ad click tracking explained for affiliate marketers covers the postback wiring in detail if you need a visual walkthrough. -
Run a 20–100 click test. Click your own link in a clean browser session, verify the redirect fires correctly, confirm UTMs appear in the destination URL, and check that your autoresponder tags the test opt-in with the correct sub-ID. Only after this test passes should you send the link to a vendor.
Which dashboard widgets actually tell you something useful?
Raw numbers without context mislead you. Each widget below answers a specific question about vendor delivery.
| Widget | What it proves |
|---|---|
| Filtered vs. raw click count | How much of the traffic your bot filter removed |
| Unique click count | Whether the vendor is sending real individual visitors |
| Click timestamp distribution chart | Whether delivery was paced naturally or dumped in a burst |
| Unique IP count and top ASNs | Whether traffic came from residential ISPs or data-center blocks |
| Geo/device split | Whether the audience matches the vendor's claimed Tier-1 list |
| Opt-in rate by sub-ID | Whether the traffic actually matches your offer |
| Conversion funnel rates | Where subscribers drop off after opt-in |
| 30-day revenue per source | Long-term value of each vendor's list |
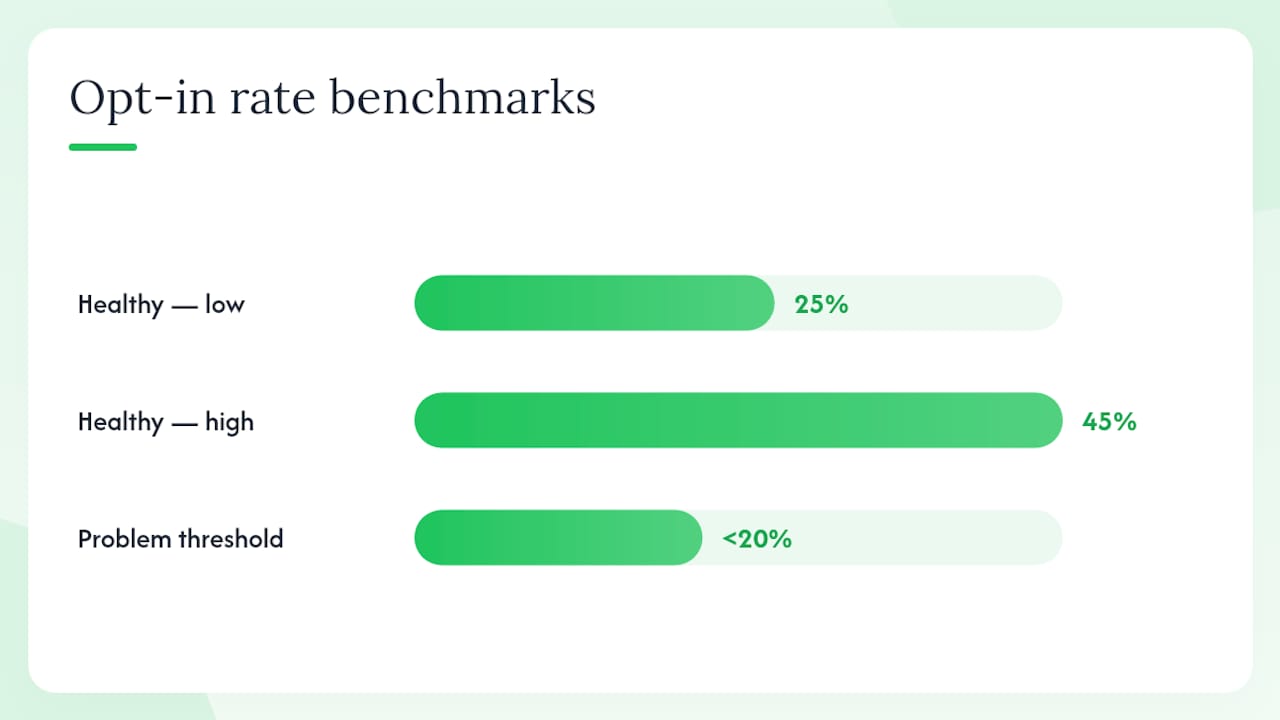
Healthy squeeze pages typically see 25–45% opt-in rates depending on design and audience match. If a vendor's traffic lands below 20%, the issue is usually targeting, not your page, especially when other vendors hit normal rates on the same funnel.
The ASN column deserves attention. ASN reputation scoring classifies traffic by whether it originates from residential ISPs, mobile carriers, or data-center/hosting providers. A high share of data-center ASNs in a solo ad order is a strong fraud indicator because real email subscribers read mail from home or mobile connections.
How do you verify delivery and spot fraud in real time?
Compare your tracker's filtered unique click count to the vendor's reported count within the first few hours of delivery. Natural pacing looks like a gradual curve across 24–48 hours. A burst of hundreds of clicks in under 30 minutes is a red flag regardless of what the vendor reports.
Common fraud patterns to watch for:
- Single-IP storms: dozens of clicks from one IP address within minutes
- Rapid-reload clusters: the same IP hitting the link repeatedly with short intervals
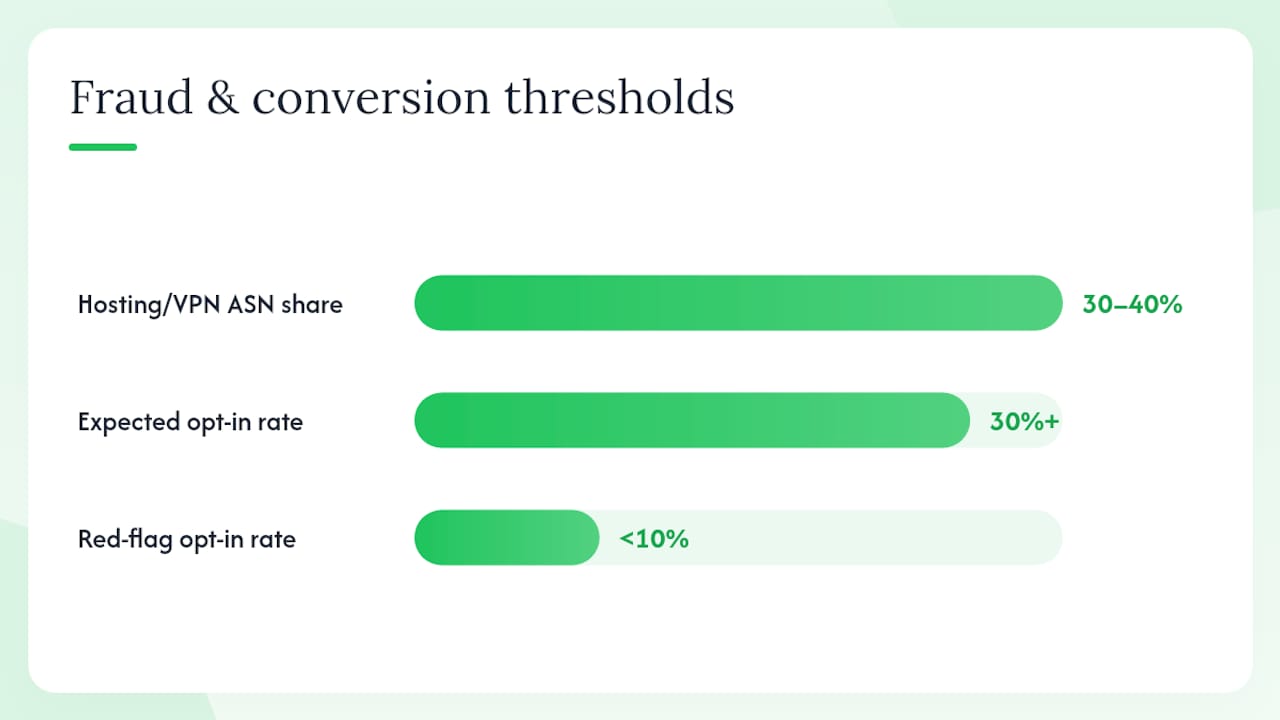
- Data-center ASN dominance: more than 30–40% of clicks from hosting or VPN ASNs
- Impossible geo patterns: clicks claiming to be from Tier-1 countries but routing through Eastern European or Southeast Asian data centers
- High click-to-opt-in collapse: strong click numbers but opt-in rate under 10% on a page that converts at 30%+ for other vendors
When you need to escalate, send the vendor a short message with your tracker screenshot attached:
"My independent tracker recorded [X] unique filtered clicks against your reported [Y]. That's a [Z]% discrepancy. Please share a date-stamped screenshot from your sending platform showing delivery timestamps and click counts, or provide replacement clicks to cover the shortfall."
Requesting date-stamped screenshots and placing a small test order before committing to a large buy is the standard verification practice. Vendors who refuse both are telling you something.
How does the 21-question framework map to your dashboard?
The Soloadsguide 21-Question Vendor Vetting Framework turns pre-buy questions into specific evidence you can store and verify. The table below maps the highest-impact questions to dashboard fields.
| Vendor disclosure question | Dashboard field | Acceptable value |
|---|---|---|
| "How do you count clicks?" | Filtered unique clicks vs. vendor count | Within 5–15% |
| "What Tier-1 percentage do you guarantee?" | Geo split widget | majority from US/UK/CA/AU |
| "Do you use unique, filtered tracking?" | Bot-filtered share | Under 8–10% filtered |
| "Can you share a recent tracker screenshot?" | Vendor-provided screenshot vs. your log | Timestamps match delivery window |
| "What is your typical opt-in rate?" | Opt-in rate by sub-ID | 25–45% for a tested squeeze page |
Solo ad stats require context to mean anything. A vendor showing 45% opt-in rates on a different funnel type tells you nothing about what your funnel will do. Ask for screenshots from campaigns using the same funnel structure as yours.
Items you can verify independently: unique click count, bot-filtered share, ASN/geo split, click pacing, and opt-in rate. Items requiring vendor cooperation: sending platform logs, list segment used, and suppression list applied.
US privacy and data-handling basics for click tracking
When you log IP addresses and click metadata, you are handling personal data under an evolving patchwork of US state privacy laws, including the California Consumer Privacy Act (CCPA) and similar statutes in Virginia, Colorado, and Texas.
A minimal-compliance checklist for click tracking:
- Log only the fields your fraud investigation requires (IP, ASN, timestamp, sub-ID, geo at country/state level)
- Apply access controls so tracker logs are not publicly accessible
- Document a retention schedule: raw IPs deleted or hashed after 30–60 days
- If a vendor sends you subscriber data from the EU or UK, confirm your autoresponder's data processing terms cover cross-border transfers
This is general information, not legal advice. Confirm your specific obligations with a qualified attorney familiar with US state privacy law and your autoresponder provider's data processing agreement.
Key Takeaways
A working solo ad analytics dashboard setup requires an independent tracker link with sub-IDs, bot filtering, conversion postbacks, and a campaign log that records five core values per vendor test.
| Point | Details |
|---|---|
| Tracker parity threshold | A 5–15% gap is normal; above 25% discrepancy warrants a dispute before payment. |
| Bot-filter benchmark | Bot-filtered clicks above 8–10% of total traffic is a red flag requiring vendor action. |
| Opt-in rate range | Healthy squeeze pages typically convert at 25–45%; below 20% signals a targeting mismatch. |
| Campaign log discipline | Record vendor, vendor clicks, tracker clicks, opt-ins, and 30-day revenue for every test order. |
| Soloadsguide framework | Apply the 21-Question Vendor Vetting Framework to map each dashboard field to a vendor disclosure request. |
Why most buyers set up tracking too late
Most affiliate marketers install a tracker after they have already been burned. They buy 500 clicks, see weak opt-ins, and then wonder whether the traffic was real. By that point, the vendor has been paid, the logs are gone, and there is nothing to dispute.
The dashboard described in this guide is not a post-mortem tool. It is a pre-payment verification system. The difference is whether you have evidence before the invoice is due or after.
Eleven years of watching this industry from the vendor side makes one thing clear: the buyers who consistently get good results are not the ones who found better vendors. They are the ones who built a verification habit early and applied it to every order, including orders from vendors they trusted. A vendor's past performance does not guarantee their next mailing will use the same list segment, the same suppression, or the same sending infrastructure.
The 21-Question Vendor Vetting Framework exists because trust without evidence is just hope. Your dashboard is the evidence layer. Use it on the first order, not the fifth.
Soloadsguide resources to put this into practice
The fastest way to implement what this guide covers is to start with the Soloadsguide buyer's checklist, which packages the 21-Question Vendor Vetting Framework into a downloadable format you can use on your next vendor conversation. It maps directly to the dashboard fields covered above, so you are not building your verification process from scratch.

Visit Soloadsguide to download the vetting checklist and access the full library of tracking tutorials, including a sample CSV template for logging campaign results. If you want to go deeper on tracker configuration, the solo ad cost per lead optimization guide shows how to use your dashboard data to improve cost-per-lead over time. Download the checklist, run a 100-click test on your next vendor, and let your tracker tell you whether the traffic is worth scaling.
Useful sources
- How to Track Solo Ad Clicks Like a Pro (Free Setup) | Ihsan Solo Ads
- 7 Red Flags That Reveal a Bad Solo Ad Vendor | Ihsan Solo Ads
- How to Use Solo Ads for CPA Marketing | RevBoost™
- Solo Ad Stats: What to Check Before You Buy Traffic
- How to Build a Real-Time Ad Fraud Detection Engine Using ASN Reputation Data
- Solo Ad Click Tracking Explained for Affiliate Marketers
Recommended
- How to Track Solo Ad Traffic (Catch Low-Quality Clicks)
- How to Vet Solo Ad Sellers (Before You Spend a Dollar)
- Solo Ad Click Tracking Explained for Affiliate Marketers
- Why Your Solo Ads Are Failing (2026 Fixes That Scale)
Want Verified Traffic Without the Guesswork?
PulseTraffic screens every seller, filters bot clicks in real time, and shows you verified buyer traffic labels before you spend a dollar.