

The surest way to verify solo ad traffic is to run a small, tracked test using a tracking link you control, then compare vendor-reported clicks against your own independently tracked opt-ins on a dedicated thank-you page. Order 100 to 200 clicks, log every number in a spreadsheet, and let that side-by-side comparison, not the vendor's screenshots, tell you whether the traffic is worth scaling.
TL;DR:
- Running a small, tracked test with 100 to 200 clicks allows accurate verification of vendor-reported traffic against independent tracking data.
- Set clear success benchmarks beforehand, including opt-in rate, cost per subscriber, and 30-day revenue, to evaluate vendor performance objectively.
- Use a dedicated, tamper-proof tracking system with UTM parameters, sub-IDs, and bot filtering to detect and prevent click fraud and traffic manipulation.
- Analyze a series of campaigns in a spreadsheet to identify patterns, trends, and gradual degradation of traffic quality over time.
- Prioritize vendor transparency, willingness to share proof, and adherence to tracking protocols during vetting to avoid scams and questionable traffic sources.
Table of Contents
- Set Clear Goals and Success Metrics Before You Buy Solo Ads
- Build an Independent Tracking System That Vendors Can't Inflate
- Metrics That Matter and What Healthy Numbers Look Like
- Vendor Vetting: Questions, Red Flags, and What Honest Sellers Share
- Running a Small Verification Test: Step by Step
- Why the Spreadsheet Matters More Than Any Single Test
- Catching Bot Traffic and Fraudulent Clicks in Solo Ads
- Judging Traffic Quality Beyond the Opt-In Number
- Staying Compliant While Verifying Solo Ad Traffic
- Common Mistakes When Reading Solo Ad Tracking Data
- What Eleven Years of Watching This Industry Teaches You
- Get the Vetting Checklist and Tracker Templates
- Sources
- FAQ
Set Clear Goals and Success Metrics Before You Buy Solo Ads
Most buyers skip this step and pay for it later. Before you send a single dollar to a vendor, decide what a "win" actually looks like for your campaign, because a tracking report means nothing if you never defined success in advance.
Start by picking one primary conversion event: an opt-in, a sale, or a booked call. Trying to track all three with equal weight on a first order just muddies your data. Then set your measurement window. A 30-day revenue window is standard in solo ad analysis because front-end opt-in numbers alone routinely mislead buyers about true campaign ROI once back-end sales and unsubscribes are factored in.
With your conversion event and window locked in, define the specific KPIs you'll judge the traffic against:
- Opt-in rate: subscribers divided by unique clicks, benchmarked against your squeeze page's historical average.
- Cost per subscriber (CPS): total spend divided by opt-ins.
- Earnings per click (EPC): 30-day revenue divided by total clicks sent.
- Bot-filter share: percentage of clicks your tracker flags as non-human or duplicate.
- Unique click parity: how closely your tracker's unique click count matches the vendor's reported click count.
Set red-flag thresholds for each before the campaign starts, not after you see the numbers. If you wait until the data comes in, it's tempting to rationalize a bad number instead of acting on it. A vendor whose reported clicks run 20% higher than what your tracker records is a different conversation than one running 3% higher, and you want that line drawn in advance.
These aren't abstract targets. They're the numbers you'll use in the next section to decide, coldly and without emotion, whether a vendor deserves a second order.
Build an Independent Tracking System That Vendors Can't Inflate
A vendor's internal dashboard is not proof of anything. It's their number, from their system, with no outside check. To verify solo ad traffic, you need a tracking layer the vendor doesn't control and can't edit after the fact.
Here's how to build it correctly:
- Create a unique tracking link for every vendor and every campaign. Never reuse the same link across two sellers. If a link gets shared or resold without your knowledge, a unique link per vendor is the only way you'll trace it back to the source.
- Require sub-IDs on every link. Tag each link with the vendor's name and the campaign date (something like
vendorname_030326). This lets you filter and compare vendors inside one tracker account instead of juggling spreadsheets across ten different logins. - Append UTM parameters to every link before it goes to the vendor. UTM tags let GA4 capture the source, medium, and campaign name and attach them directly to conversion events, so a sale three weeks from now still traces back to the exact solo ad that generated it.
- Feed those UTM and sub-ID values into your autoresponder. Most autoresponders let you pass custom fields through your opt-in form. Tag every new subscriber with their originating vendor and campaign the moment they join your list, before the data gets lost in a generic "solo ad leads" tag.
- Turn on bot filtering and unique-click detection in your tracker. Tools like ClickMagick and Voluum both offer this natively. Without it, a single visitor refreshing a page five times looks like five clicks, and your vendor gets credit for traffic that never happened.
- Log geo, device, and timestamp data for every click. This is what lets you catch a vendor whose "US traffic" campaign is quietly delivering half its volume from click farms overseas.
- Set your thank-you page as a conversion event in GA4. GA4 is built to record a dedicated thank-you page visit as a custom conversion event, which gives you a server-side confirmation that doesn't depend on the vendor's word at all.
Pro Tip: Set your thank-you page URL to something the vendor never sees, like a randomized slug instead of "/thankyou". If a vendor is somehow generating opt-ins without ever routing traffic through your real tracking link, a hidden thank-you page URL is one of the fastest ways to catch it.
Once this system is live, you have two independent numbers for every campaign: what the vendor claims, and what your tracker recorded. The gap between them is where the real answer to "was this traffic any good" lives.
Metrics That Matter and What Healthy Numbers Look Like
Raw click counts tell you almost nothing on their own. What matters is the math you build from them, and whether that math lands inside ranges seasoned solo ad buyers consider normal.
Start with unique clicks: the number your tracker records after bot filtering and duplicate removal, not the raw hit count. Your opt-in rate is subscribers divided by unique clicks. Your cost per subscriber is total spend divided by opt-ins. Your EPC is 30-day revenue divided by total clicks purchased, and that 30-day window matters because early sales rarely capture the full back-end value of a list.
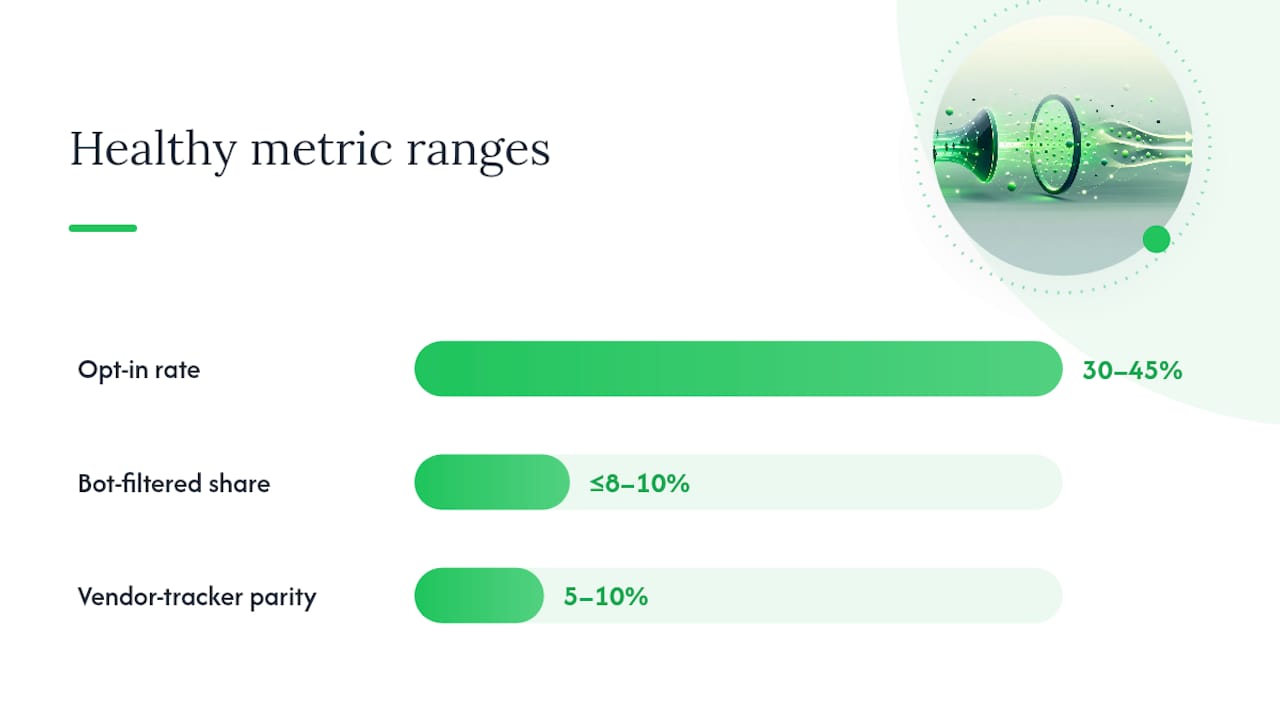
Here's where those numbers should typically land on a properly optimized squeeze page:
- Opt-in rate: 30% to 45% is a healthy range for a clean, tested landing page.
- Bot-filtered share: under 8% to 10% of total clicks. Anything higher suggests low-quality or purchased traffic.
- Vendor vs. tracker parity: your unique click count should sit within 5% to 10% of what the vendor reported. Wider gaps than that are a real problem.
- CPS: varies by niche, but a CPS wildly outside your historical average on a new vendor deserves scrutiny before you reorder.
- EPC: your best diagnostic for whether the traffic actually buys, since it's the same core metric marketing ROI analyses use to decide whether to scale or kill a campaign.
A vendor whose click parity sits 15% off your tracker isn't automatically running a scam. It might mean their tracking pixel fires early, or their redirect chain is dropping some visitors before your tracker fires. But that gap is information, and it tells you to ask harder questions before you scale spend with that seller. Traffic quality shows up in the combination of these numbers, not in any single one viewed alone. A vendor can post a great opt-in rate while still sending traffic that never buys, which is exactly why EPC and 30-day revenue belong in the same spreadsheet as opt-in rate, not a separate one you check later.
Vendor Vetting: Questions, Red Flags, and What Honest Sellers Share
Tracking data tells you what happened. Vendor vetting tells you why, and it's the step most buyers rush past because they're excited to place an order.
Ask these questions before you send payment:
- Will you use the tracking link I provide, with my sub-ID and UTM parameters intact?
- What is your typical opt-in rate on a standard squeeze page, and can you show recent tracker screenshots, not just testimonials?
- What is your delivery window, and do you spread clicks evenly or send them in bursts?
- What percentage of your list is US-based versus international, and can you break that down by campaign?
- Do you filter bot traffic and duplicate clicks before delivery, and how?
- What happens if my tracked numbers come in significantly below what you reported?
The answers matter less than the willingness to answer at all. A seller who provides direct, specific responses is already behaving differently from one who deflects.
Watch for these red flags once an order is live:
- The vendor pushes back on using your tracking link or insists on their own tracking only.
- Pricing that's dramatically below market rate for the niche, with no explanation for the discount.
- Click delivery arriving in unnatural bursts, like 40 clicks in ten minutes at 3 a.m.
- A geo split that doesn't match what was promised, especially a "US traffic" order with a heavy international skew.
- Reluctance to share timestamps or delivery pacing when you ask directly.
Honest vendors tend to volunteer proof before you ask twice. That usually means paired tracker screenshots that show their dashboard next to your independent tracker, delivery timestamps broken out by day, and a geo and device breakdown that matches what they sold you. If a seller has nothing to show beyond a total click count and a promise, treat that as incomplete information, not a finished sales pitch. Soloadsguide's vendor vetting guide walks through the full 21-question framework if you want the complete version of this checklist before your next order.
Running a Small Verification Test: Step by Step
A 100 to 200 click test order is the single most useful thing you can do before committing real budget to a new vendor, and independent guides consistently point to small tracked tests as the fastest way to validate a seller's claims before scaling spend.
Before the order goes live, confirm these four things:
- Your tracker is live and the vendor has the correct tracking link with sub-ID and UTM parameters attached.
- Your autoresponder is set to tag new subscribers with the vendor and campaign source automatically.
- Your landing page has been tested end to end, including the thank-you page redirect.
- Your GA4 conversion event is confirmed working with a manual test click before real traffic arrives.
During the run, log four things in real time: vendor-reported clicks (checked daily, not just at the end), your tracker's unique click count, total opt-ins, and the timestamp pattern of when clicks arrived. Geo and device splits should get logged the same way, since a clean day-one report can still hide a bad pattern that only shows up once you look at hour-by-hour delivery.
Once the run finishes, put every number side by side. Calculate your CPS and EPC using actual spend and 30-day revenue, not projected figures. Compare vendor-reported clicks to your tracker's unique count and see whether that gap sits inside the 5% to 10% parity range.
From there, the decision is mechanical. If parity holds, opt-in rate lands in a healthy range, and bot-filter share stays low, scale the order. If one number is off but the rest look solid, order a second small test before committing bigger budget. If parity is badly broken or the vendor won't explain a spike, request a replacement or refund and move on. The data makes this call for you, so you don't have to guess.
Why the Spreadsheet Matters More Than Any Single Test
One test order tells you something. A spreadsheet that tracks five or ten campaigns across multiple vendors tells you a great deal more, because patterns that look like noise in a single run become obvious once you can compare them side by side.
Build one simple sheet with columns for vendor name, order date, vendor-reported clicks, your tracker's unique clicks, opt-ins, CPS, EPC, and 30-day revenue. Add every campaign to it, good or bad. A disciplined log like this reveals vendor patterns a single screenshot never will, whether that's one seller whose parity gap keeps widening over time, or a niche where opt-in rates consistently run below your benchmark regardless of vendor.
This is also how you catch slow degradation. A vendor who delivered clean traffic on your first two orders and then quietly starts padding numbers on the third won't show up as an obvious scam. They'll show up as a small parity drift that only becomes visible when you're looking at a trend line instead of one isolated report. Keep the sheet updated after every order, even the ones that go well, because the good campaigns are your baseline for spotting when something's off later.
Catching Bot Traffic and Fraudulent Clicks in Solo Ads
Bot traffic is the single biggest reason vendor click counts and tracker numbers diverge. A click bot can hit a URL, register as a visit, and never involve a real person, which is exactly why raw click totals are close to useless without filtering.
Your tracker's bot-filtering settings should flag traffic showing classic non-human signatures: no mouse movement or scroll activity on the landing page, identical timestamps down to the second across multiple "different" visitors, and repeat visits from the same IP address within seconds of each other. Most modern trackers, including ClickMagick and Voluum, build this detection in natively, but it has to be turned on and configured, not left at default settings.
Geo mismatches are another strong fraud signal. If you bought US-targeted traffic and your tracker shows a meaningful share of clicks from data centers or countries with no connection to your campaign, that's not a rounding error. Cross-reference device data too. A traffic source showing 95% desktop clicks in a niche where mobile traffic normally dominates is worth a second look before you reorder.
The most reliable long-term defense is simply comparing bot-filtered share across every vendor in your spreadsheet.
Judging Traffic Quality Beyond the Opt-In Number
Opt-in rate answers one question: did the visitor give you their email? It says nothing about whether that subscriber will ever open an email, click a link, or buy anything, and that gap is where a lot of buyers get fooled by traffic that looks great on paper.
Look at your open rate on the welcome email specifically for new subscribers tagged from that vendor's campaign, filtered separately from your existing list. A new segment with an open rate far below your list average is a sign the opt-ins were low-intent, even if the opt-in rate itself looked strong. Click-through rate on your first follow-up email is another useful signal, since real prospects tend to engage with at least one early message if the offer matched what they were expecting when they subscribed.
Unsubscribe rate in the first 48 hours matters too. A spike of immediate unsubscribes right after opt-in often means the traffic was mismatched to your offer, or the landing page over-promised something the follow-up sequence didn't deliver. Watch reply rates and spam complaints as well, since a segment that generates unusual spam complaints relative to your regular list can point to subscribers who never wanted to be there.
None of these numbers replace opt-in rate as your first filter, but they tell you whether that opt-in was worth having in the first place.
Staying Compliant While Verifying Solo Ad Traffic
Verification and compliance aren't separate concerns. A tracking setup that logs source, consent, and timestamp data for every subscriber is also your paper trail if your list's compliance ever gets questioned.
Every opt-in captured through a solo ad still needs to go through a real double opt-in confirmation, not just land on your list because a vendor sent the click. This protects your sender reputation and gives you a documented consent record tied to the exact campaign and vendor, which your tagged UTM and sub-ID data already provides. Make sure your autoresponder's compliance settings, including a visible unsubscribe link and accurate sender information, apply to every list segment equally, regardless of which vendor sourced the subscriber.
Keep vendor-level records of where each batch of subscribers came from and when they opted in. If a complaint or deliverability issue ever traces back to a specific campaign, that record lets you isolate the source instead of guessing across your entire list. This is one more reason the tracking system described earlier isn't just about catching bad vendors. It's also the documentation that protects your email program if a regulator or your email service provider ever asks where a segment of subscribers originated.
Common Mistakes When Reading Solo Ad Tracking Data
The most common mistake is judging a campaign on day one. Solo ad delivery often spreads across 24 to 72 hours, and early numbers before delivery completes will always look worse than the final report. Wait until the vendor confirms full delivery before you calculate final metrics.
A second mistake is comparing raw vendor clicks to your tracker's unique clicks without normalizing for bot filtering first. If your tracker recorded 180 unique clicks after filtering out 20 bot hits from a 200-click order, and the vendor reported 195, your real parity comparison is 180 versus 195, not 200 versus 195. Skipping that filtering step makes gaps look smaller than they are.
A third mistake is treating a single bad metric as proof of a scam. A slightly low opt-in rate on one order could reflect your landing page, your offer, seasonal list fatigue, or genuine traffic quality issues. Look at the full picture, opt-in rate, parity, bot share, and EPC together, before drawing a conclusion about the vendor.
Finally, buyers sometimes judge revenue too early. A 30-day window exists because back-end sales frequently outweigh what a campaign generates in its first 48 hours, and cutting your revenue analysis short punishes vendors whose traffic converts on a slower timeline, even when that traffic is genuinely good.
What Eleven Years of Watching This Industry Teaches You
The single most reliable signal in this entire process isn't a metric. It's willingness. A vendor who resists using a tracking link you control, or who insists their own dashboard is the only number that matters, is telling you something even if they never say it outright.
The 21-question vetting framework exists because tracking data alone can't catch everything a bad actor will try. A vendor can pass a parity check on one small test and still cut corners on a bigger order later, which is exactly why the questions about geo splits, delivery pacing, and proactive documentation matter as much as the spreadsheet itself. Buyers who skip vetting and rely purely on one clean test often get burned on their second or third order, once a seller learns which numbers a given buyer actually checks.
Tracking and vetting work as a pair, not as substitutes for each other.
— Philip Coble
Get the Vetting Checklist and Tracker Templates
Building the tracking and vetting system described here from scratch takes time most affiliate marketers don't have between running campaigns and managing their own list. Soloadsguide's downloadable resources give you the working version instead of a blank spreadsheet.

The checklist package includes the full 21-question vendor vetting framework, a step-by-step tracker setup guide covering sub-IDs, UTM parameters, and bot filtering, and a ready-to-use campaign spreadsheet template with columns already built for vendor-reported clicks, tracker-unique clicks, opt-ins, CPS, EPC, and 30-day revenue. Soloadsguide doesn't sell traffic or broker introductions to vendors. It's a purely educational resource built around one goal: helping you verify a seller's claims before you spend a dollar, not after. If you're about to place your first order with a new vendor, or you've been burned once already and want a repeatable process instead of a gut check, visit Soloadsguide to download the checklist and templates and set up your next campaign with real proof instead of a promise.
Sources
For hands-on setup, GA4's conversion event guide and UTM parameter documentation cover the exact configuration steps referenced above. Soloadsguide's own tracking walkthrough and fake-click detection guide go deeper into implementation specifics.
- Set up conversion events in Google Analytics 4
- Use UTM parameters to track campaigns in GA4
- How To Analyze Solo Ads Campaigns - Working With Walter
- Solo Ad Stats: What to Check Before You Buy Traffic
FAQ
Is Udimi Legit?
Udimi is a real, established solo ad marketplace, but "legit" as a platform doesn't guarantee any individual seller on it delivers quality traffic. Verify every vendor you buy from, on Udimi or elsewhere, with your own tracking link and a small test order before committing larger budget.
How Much Do Solo Ads Cost?
Solo ad pricing varies significantly by niche, vendor reputation, and list size, typically quoted per click rather than as a flat campaign fee. Rather than judging a price as high or low in isolation, compare it against the CPS and EPC your tracked test produces to see if the traffic pays for itself.
Are Solo Ads Worth It?
Solo ads can be worth it when the traffic is verified through independent tracking and the resulting opt-in rate, CPS, and EPC fall inside healthy benchmark ranges. They're rarely worth it when a buyer skips verification and relies solely on a vendor's self-reported numbers.
What Are Solo Ads?
A solo ad is a single promotional email sent to another marketer's email list on your behalf, usually built around one offer and one call to action. You pay for a set number of clicks to your link, and the traffic quality depends entirely on that list's engagement, which is why verification matters more than the price per click.
How Many Clicks Should a Verification Test Use?
A 100 to 200 click test order gives you enough data to calculate meaningful opt-in rate, CPS, and EPC figures without overspending on an unverified vendor. Use that test to decide whether to scale, request a replacement, or move on before placing a larger order.
Recommended
- Why Your Solo Ads Are Failing (2026 Fixes That Scale)
- How to Verify Vendor Testimonials for Solo Ad Buyers
- How to Test Order Solo Ads Without Wasting Your Budget
- How to Track Solo Ad Traffic (Catch Low-Quality Clicks)
Want Verified Traffic Without the Guesswork?
PulseTraffic screens every seller, filters bot clicks in real time, and shows you verified buyer traffic labels before you spend a dollar.