

Only buy solo ads when you can track conversions per vendor. Without that, you are not running a campaign — you are guessing with your budget. The good news: setting up proper tracking takes less than a day, and the data it produces will tell you within a moderate number of clicks whether a vendor deserves more of your money.
Here is the three-step checklist to run before you spend a dollar:
- Track: Enable a third-party tracker (ClickMagick or Voluum) with subIDs and UTM parameters on every link before the campaign goes live. Accurate click tracking is the foundation everything else rests on.
- Test: Run a moderate-sized click test per vendor. Never scale on assumptions.
- Verify: Measure EPC and CPL over a 30-day window. Front-end opt-ins alone do not tell you whether a vendor is profitable.
Conversion tracking ties every click to a behavior, which is the only way to make informed decisions about ad spend. Without it, attribution and optimization are guesswork. This guide gives you the tracking setup, ROI formulas, and a 21-question vendor vetting framework to run that process correctly.
Pro Tip: Set your tracking links and verify they fire correctly before you send the vendor your URL. A broken pixel on day one means you lose all attribution data from that test.
Table of Contents
- How do solo ads deliver traffic, and what are you actually buying?
- What metrics do you actually need to track?
- How do you set up conversion tracking for solo ads?
- How do you calculate whether a solo ad spend is actually profitable?
- How do you vet a vendor before you buy?
- How do you optimize and scale without burning budget?
- What mistakes are costing you money right now?
- What do copy-ready tracking setups actually look like?
- When are solo ads worth the spend?
- Key Takeaways
- The tracking gap most buyers never close
- What Soloadsguide gives you to execute this
- Useful sources and further reading
How do solo ads deliver traffic, and what are you actually buying?
A solo ad is a single promotional email sent to a vendor's list on your behalf. The vendor writes or approves the email copy, sends it to a segment of their subscribers, and you pay for the clicks that come through. The flow looks like this: email send → link click → your landing page (often a squeeze page or bridge page) → opt-in → sales page or follow-up sequence.

That flow matters because each step is a potential tracking gap. If you only measure clicks, you miss opt-in rate. If you only measure opt-ins, you miss conversion rate and EPC. Every handoff in the chain needs a tracking event.
Payment and delivery models vary, and each one affects your risk:
- Per-click (CPC): You pay for a set number of clicks, typically a moderate cost per click depending on list quality and geography. The vendor delivers until the click count is met. Refunds or "make-goods" apply if the count falls short.
- Per-opt-in (CPL): You pay only when a visitor opts in. Higher cost per unit, but the vendor absorbs some traffic quality risk.
- Fixed blast (flat fee): You pay a flat rate for a send to a defined list size. Click volume is not guaranteed, which makes cost-per-click unpredictable.
One term that causes constant confusion is "unique clicks." Most vendors filter out repeat clicks from the same IP address and report only uniques. How aggressively they filter, and whether their definition matches your tracker's definition, directly affects your cost calculations. Always confirm the vendor's filtering method before you run.
What metrics do you actually need to track?
Vanity metrics like raw click counts and open rates tell you almost nothing about profitability. The metrics below are the ones that drive real decisions.
| Metric | Formula | Why It Matters |
|---|---|---|
| Opt-in rate | Opt-ins ÷ unique clicks × 100 | Measures landing page and offer relevance |
| EPC (earnings per click) | Revenue ÷ total clicks | Single best indicator of vendor profitability |
| CPL (cost per lead) | Ad spend ÷ total leads | Tells you what each subscriber costs |
| CPA (cost per acquisition) | Ad spend ÷ paying customers | Measures front-end conversion efficiency |
| Conversion rate | Sales ÷ unique clicks × 100 | Tracks click-to-customer efficiency |
| LTV (lifetime value) | Total revenue per customer over time | Determines true 30–90 day profitability |
| Unsubscribe/complaint rate | Unsubs or complaints ÷ sends × 100 | Flags list quality and audience mismatch |
Conservative benchmark guidance by niche:
- Opt-in rates in warmer niches tend to be higher than in colder or more complex offers.
- Front-end conversion rates vary, with notably high rates on cold traffic worth investigating for funnel fit.
- Break-even EPC is tied to your cost per click; back-end email sequences usually help push EPC above break-even.
EPC is the metric to anchor on. Opt-in and conversion rates vary widely by niche, and front-end EPC often underperforms until email follow-up accrues back-end revenue over 30–180 days. A vendor with a 25–45% opt-in rate in warmer niches or 10–25% in colder offers is typical, but the decisive metric is EPC: campaigns that exceed $0.30–$1.20 per click are generally in profitable range, so measure both EPC and opt-in rate before scaling.
Check solo ad performance benchmarks by niche to calibrate your expectations before you run your first test.
How do you set up conversion tracking for solo ads?
Proper tracking setup is a one-time investment that pays back on every campaign you run. Follow these steps in order.
-
Build your tracking link with subIDs and UTMs. Use a URL structure like:
https://yourpage.com/?utm_source=solo&utm_medium=email&utm_campaign={vendor_name}&subid={click_id}The{vendor_name}and{click_id}placeholders get replaced with actual values either manually or by your tracker. SubIDs let you tie individual clicks back to specific vendors and even specific sends. -
Set up your third-party tracker. ClickMagick and Voluum both support subID-level tracking and postback configurations. Create a campaign in your tracker, generate a tracking link, and route all vendor traffic through it before it hits your landing page. This gives you an independent click count that you can compare against the vendor's reported numbers.
-
Configure postback or server-side events where possible. Client-side pixels miss conversions when users block cookies or switch devices. A server-side postback fires from your server to your tracker when a conversion event occurs, making it far more reliable for opt-in and sale attribution.
-
Install Google Tag Manager and set up GA4 conversion events. Use GTM to fire GA4 events on opt-in form submissions and thank-you page views. Google recommends using its tagging solutions for page-view and codeless events when tracking conversions. Note that GA4 has cross-device attribution limits — it works well for trend analysis but should not be your only source of truth for vendor-level decisions.
-
Run a verification test before the campaign goes live. Click your own tracking link, complete the opt-in, and confirm the event appears in both your tracker dashboard and GA4. Check that the subID passes through correctly.
-
Compare dashboards after the campaign. Your tracker's click count and the vendor's reported click count will rarely match exactly. A 5–10% variance is normal. A 20%+ gap warrants a direct conversation with the vendor.
Pro Tip: Always use a dedicated tracking domain (not your main domain) for your ClickMagick or Voluum links. This prevents deliverability issues if a tracking domain gets flagged, and it keeps your primary domain's reputation clean.
For a deeper walkthrough on tracking link formats and subID verification, Soloadsguide has a step-by-step implementation guide.

How do you calculate whether a solo ad spend is actually profitable?
The core formulas are straightforward. The challenge is applying them over the right time window.
Core formulas:
- EPC = Total revenue ÷ total clicks
- CPL = Total ad spend ÷ total leads generated
- CPA = Total ad spend ÷ total paying customers
- ROAS = Total revenue ÷ total ad spend
- LTV-adjusted ROI = (LTV × customers acquired) ÷ ad spend
Three illustrative scenarios:
Scenario 1 — Loss: A campaign with modest clicks and opt-ins leads to front-end revenue that does not cover ad spend. Back-end follow-up sales can reduce the loss.
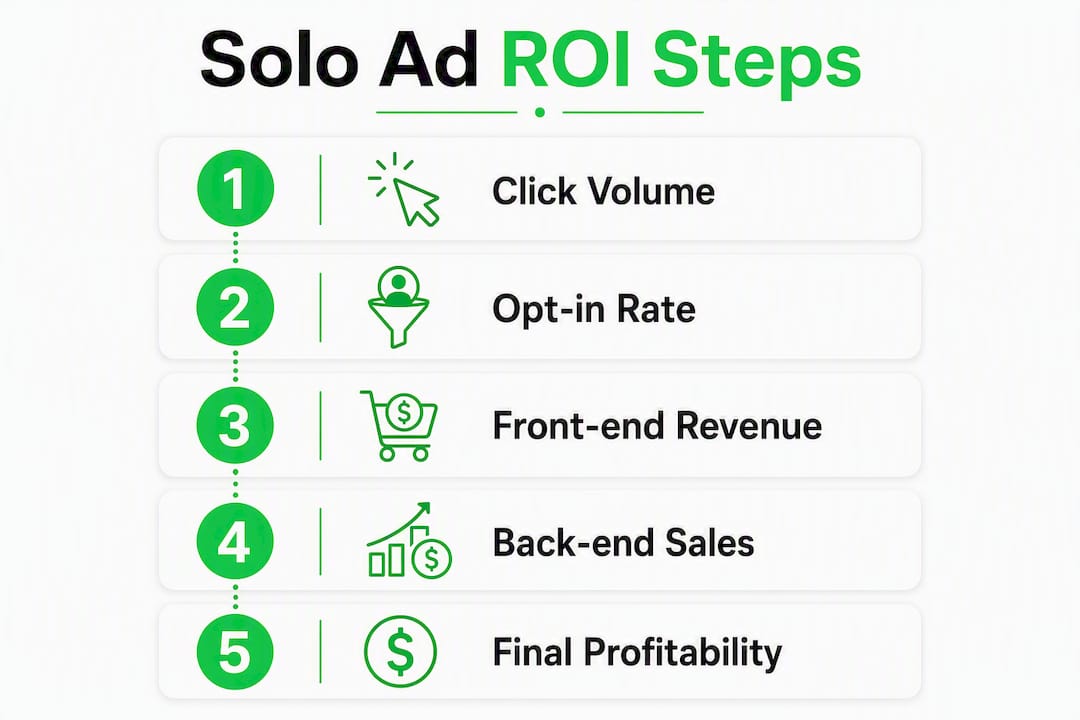
Scenario 2 — Break-even: Improved opt-in and conversion rates plus back-end sales make the campaign profitable after some time.
Scenario 3 — Profitable: Higher opt-in and sale counts with significant back-end revenue create a profitable campaign.
These scenarios show that front-end revenue alone rarely covers solo ad spend, with follow-up sequences driving profitability over time.
The pattern across all three scenarios is the same: front-end revenue rarely covers solo ad spend on its own. CPC ranges of roughly $0.30–$1.20 mean your email sequence has to do the heavy lifting. This is why judging a vendor after 48 hours is almost always wrong.
Spend allocation rules:
- Minimum moderate click volume per test to get statistically meaningful opt-in data and reliable EPC data.
- Hold a vendor for a sufficient period before making a scale or drop decision.
- Re-test a vendor periodically if your funnel or offer changes significantly.
For tactics on reducing CPL as you scale, see Soloadsguide's guide on cost per lead optimization.
How do you vet a vendor before you buy?
The 21-question vendor vetting framework covers every dimension that predicts traffic quality. Here is a condensed version of the key questions to ask before committing budget.
List provenance and audience:
- Where did the subscribers on this list come from originally?
- How recently were they acquired?
- What niche or interest segment does this list serve?
- Are subscribers single opt-in or double opt-in?
Traffic quality and filtering:
- How do you define and filter unique clicks?
- What percentage of your traffic is Tier 1 (US, UK, CA, AU)?
- Can you provide a recent campaign's click report with timestamps?
- What is your average open rate and click-through rate across recent sends?
Tracking and transparency:
- Do you allow third-party tracking links (ClickMagick, Voluum)?
- Will you accept subID parameters in the destination URL?
- Can I see a sample invoice from a recent buyer?
Replacement and refund policy:
- What is your make-good policy if click count falls short?
- Do you offer replacements for bot or low-quality traffic?
- Is the replacement policy documented in writing?
Proof of recent performance:
- Can you share a dated screenshot of a recent campaign's stats?
- Have you run offers in my niche in the last 60 days?
"Vendor-provided screenshots are often cherry-picked and lack context. Independent tracking and small proof runs are the only reliable judge of traffic quality." — MKAuthority
Test-buy protocol:
- Start with a small to moderate number of clicks on the first buy.
- Use your own tracking link with a subID matching the vendor's name.
- Allow the vendor to use their own swipe copy or a version you approve.
- Measure unique click percentage, opt-in rate, and EPC across key time checkpoints.
- Pass criteria: unique click rate above 70%, opt-in rate within the typical 25–45% (warmer niches) or 10–25% (colder offers) benchmarks, EPC trending toward break-even ($0.30–$1.20 per click) by day 30.
Red flags that warrant immediate action:
- Vendor refuses to accept a third-party tracking link. Walk away.
- Screenshots show impressive stats but no dates or campaign IDs.
- Unique click rate below 50% (suggests bot or recycled traffic).
- No written replacement policy.
- Pressure to buy large volumes on the first order.
For a complete list of vetting questions and warning signs, the advanced vendor vetting checklist on Soloadsguide covers each one in detail.
How do you optimize and scale without burning budget?
Scaling a solo ad campaign is a disciplined process, not a volume decision. Here is the sequence that works.
-
Isolate one variable per test. Change the headline, the bridge page, or the lead magnet — never two at once. If you change the headline and the lead magnet simultaneously and results improve, you will not know which change drove it.
-
Run parallel vendor tests with identical funnels. Use subIDs to separate traffic from each vendor in your tracker. This lets you compare EPC and opt-in rate across vendors under controlled conditions.
-
Apply the scale decision rule. Increase volume with a vendor only when EPC is at or above your break-even threshold and opt-in rate is stable across two consecutive tests. If either metric drops, pause and investigate before adding budget.
-
Sequence your follow-up emails over 30–180 days. Most solo ad leads will not buy on day one. A 7-email sequence over the first 14 days, followed by a weekly broadcast for 90 days, captures the back-end revenue that makes the math work. Tag subscribers by the subID they came from so you can measure which vendor's leads convert best downstream.
-
Re-test paused vendors quarterly. List quality changes. A vendor whose traffic underperformed six months ago may have refreshed their list. A 100-click re-test costs little and occasionally surfaces a newly viable source.
Pro Tip: Use your tracker's subID data to build a vendor scorecard. Track EPC, opt-in rate, and 30-day LTV per vendor in a simple spreadsheet. After five or six tests, the pattern of which vendors consistently outperform becomes obvious — and that is where you concentrate budget.
For funnel optimization tactics that work alongside vendor testing, see Soloadsguide's guide on optimizing your solo ad sales funnel.
What mistakes are costing you money right now?
Most solo ad buyers lose money for predictable reasons, and most of those reasons come down to skipping steps.
- No third-party tracking. Relying on the vendor's dashboard means you have no independent verification of click counts or conversion events. Fix: install ClickMagick or Voluum before your first campaign and route all traffic through it.
- Trusting seller screenshots. Screenshots and seller-reported stats can be misleading; independent click verification is the only reliable way to confirm vendor quality. Fix: require a third-party tracking link on every order.
- Judging a vendor on front-end results only. A vendor with a 25–45% opt-in rate (warmer niches) or 10–25% (colder/complex offers) and zero front-end sales is not necessarily a bad vendor. If the list is responsive and your follow-up sequence is weak, the problem is your funnel. Fix: run at least a 30-day EPC analysis before dropping a vendor.
- Ignoring opt-in quality signals. High opt-in rates paired with high unsubscribe rates suggest the traffic is incentivized or mismatched to your offer. Fix: monitor unsubscribe rates per vendor segment in your email platform.
- Skipping the follow-up sequence. Sending traffic to a squeeze page with no automated follow-up is the single most common reason buyers report poor solo ad ROI. Fix: build a minimum 7-email sequence before you buy any traffic.
Buy/do not buy decision checklist:
- Vendor accepts third-party tracking link: Yes / No
- Vendor provides documented replacement policy: Yes / No
- Vendor confirms Tier 1 traffic percentage: Yes / No
- You have a working tracking setup with subIDs: Yes / No
- You have an email follow-up sequence in place: Yes / No
If any answer is No, do not buy until it is resolved.
What do copy-ready tracking setups actually look like?
Three levels of setup, from basic to advanced, cover most affiliate marketers' needs.
| Setup Level | URL Template | Tools Required | Best For |
|---|---|---|---|
| Basic | page.com/?utm_source=solo&utm_medium=email&utm_campaign=vendorname | GA4 + GTM | First-time buyers, low volume |
| Intermediate | trk.yourdomain.com/go/vendorname?subid=vendorname&click_id={click_id} | ClickMagick + GA4 | Active buyers testing 2–5 vendors |
| Advanced | trk.yourdomain.com/go/vendorname?subid={click_id} + server-side postback | Voluum + GA4 + server postback | Scaling buyers, high-volume campaigns |
Verification steps by setup level:
-
Basic (UTM + GA4): After clicking your own link, open GA4's Realtime report and confirm the session appears with the correct
utm_campaignvalue. Check that the opt-in thank-you page fires agenerate_leadevent. -
Intermediate (ClickMagick + subID): Click your ClickMagick tracking link and verify the click appears in your ClickMagick dashboard within 60 seconds. Complete the opt-in and confirm the conversion event fires. Compare the click count in ClickMagick against the vendor's reported count after 24 hours.
-
Advanced (Voluum + postback): Set up a postback URL in Voluum pointing to your offer's thank-you page. After a test conversion, confirm the postback fires and the conversion appears in Voluum with the correct subID. Cross-reference against GA4's conversion events.
Common mismatch causes and fixes:
- Vendor count higher than tracker count: vendor may be counting non-unique or bot clicks your tracker filters out.
- Tracker count higher than GA4 count: GA4 is missing events due to ad blockers or cookie consent issues. Server-side postback solves this.
- SubID not passing through: check that your landing page preserves URL parameters and passes them to the opt-in form's hidden fields.
For a practical walkthrough of how to track solo ads and catch low-quality clicks, Soloadsguide covers the troubleshooting steps in detail.
When are solo ads worth the spend?
Solo ads are worth buying when three conditions are met: you have third-party conversion tracking active, you have a tested follow-up sequence, and you have a vendor who passes the vetting framework. Without all three, the risk of wasted spend is high.
Decision checklist before any solo ad purchase:
- Third-party tracker installed and verified: required.
- SubIDs configured per vendor: required.
- Minimum test budget available (100–500 clicks at $0.30–$1.20 per click): required.
- Email follow-up sequence of at least 7 emails ready: required.
- Vendor has passed at least 10 of the 21 vetting questions: required.
Recommended next steps:
Set up ClickMagick or Voluum with a subID template today. Run a 100–300 click test with one vetted vendor. Measure opt-in rate at 48 hours and EPC at 30 days. Apply the 21-question framework before you commit to a second order from any vendor.
If you are not ready yet: build your email follow-up sequence first. Solo ad traffic without a back-end sequence almost never breaks even on the front end. A 7–10 email sequence covering your offer's core value, objections, and a secondary offer is the minimum viable back end before you buy traffic.
For context on how solo ads fit alongside other acquisition channels, Soloadsguide's breakdown of solo ads vs email marketing is a useful reference.
Key Takeaways
Conversion tracking per vendor is the non-negotiable foundation of profitable solo ad spend: without it, you cannot separate a good vendor from a bad one, and you cannot scale what works.
| Point | Details |
|---|---|
| Track per vendor from day one | Use subIDs and a third-party tracker like ClickMagick or Voluum on every campaign before it goes live. |
| Test with 100–500 clicks minimum | Never scale a vendor without a verified test that includes 30-day EPC and opt-in rate data. |
| Judge on EPC and LTV, not opt-ins | Front-end opt-in rates are incomplete; measure EPC at 30 days and LTV across your email sequence. |
| Vet before you buy | Run vendors through the 21-question framework and require a documented replacement policy before committing budget. |
| Soloadsguide provides the execution kit | The 21-question checklist, tracking templates, and test-buy protocol are available at Soloadsguide to help you implement these steps immediately. |
The tracking gap most buyers never close
The debate over solo ad spend vs conversion tracking usually gets framed as a cost question: is the traffic cheap enough to be worth it? That framing misses the real issue. The question is not whether solo ads are cheap. It is whether you can measure what the traffic actually does after the click.
Most buyers set up a squeeze page, buy 200 clicks, check their opt-in count at 48 hours, and make a keep-or-drop decision based on that single number. That is the wrong measurement at the wrong time. Opt-in rate tells you about your landing page. It tells you almost nothing about the vendor's list quality, the subscribers' intent, or whether any of them will ever buy anything.
The buyers who consistently profit from solo ads treat each vendor as a separate data segment and track EPC over 30–180 days. They run small tests, compare tracker data against vendor data, and scale only when the numbers hold across two consecutive runs. They also build email sequences that do the real conversion work, because cold solo ad traffic almost never converts on the front end at a rate that covers CPC.
The 21-question vetting framework is not bureaucratic caution. It is the fastest way to filter out vendors who will waste your budget before you spend it. A vendor who refuses third-party tracking is telling you something important about their traffic quality. A vendor with no documented replacement policy is telling you something about how they handle accountability. Both signals are worth acting on before you buy.
What Soloadsguide gives you to execute this
Knowing the framework is one thing. Having the templates, checklists, and tracking examples ready to deploy is another. Soloadsguide's Solo Ads Buyer's Guide gives you the complete execution kit: the full 21-question vendor vetting checklist, copy-ready tracking link templates with UTM and subID examples, a step-by-step test-buy protocol, and a 30-day EPC measurement worksheet.
This is not a traffic vendor. Soloadsguide is an educational resource built specifically for affiliate marketers who want to buy solo ad traffic without getting burned. The buyer's guide is the practical companion to everything covered in this article — the kind of resource you use the day you decide to run your first (or next) test. Get the checklist, set up your tracking, and run a verified test before you commit serious budget to any vendor.
Useful sources and further reading
- About conversion measurement — Google Ads Help: Google's official explanation of how conversion tracking works, what counts as a conversion, and how to use the data to improve campaign decisions.
- Set up your web conversions — Google Ads Help: Step-by-step instructions for setting up GA4 conversion events using Google Tag Manager and codeless tagging solutions.
- The Importance of Conversion Tracking — Logical Position: A clear explanation of why conversion tracking is the foundation of any paid traffic strategy and how to implement it correctly.
- Solo Ad Stats: What to Check Before You Buy Traffic — MKAuthority: Practical guide to evaluating vendor-reported stats and why independent verification is the only reliable measure of traffic quality.
- Do Solo Ads Work in 2026: A Data-Driven Analysis — SIIT: Analysis of current solo ad effectiveness with notes on ClickMagick and Voluum as essential tracking tools for subID-level vendor analysis.
- Solo Ad Click Tracking Explained — Soloadsguide: Soloadsguide's overview of click tracking fundamentals for solo ad buyers, including why accurate attribution is the starting point for every campaign.
- Advanced Solo Ad Vendor Vetting Checklist — Soloadsguide: The full 21-question framework with detailed explanations of each vetting criterion and what answers to look for.
- How to Track Solo Ads (Catch Low-Quality Clicks) — Soloadsguide: Practical tracking walkthroughs, subID configuration examples, and troubleshooting steps for common tracking mismatches.
Recommended
- Solo Ad Click Tracking Explained for Affiliate Marketers
- Why Ad Frequency Affects Conversions: 2026 Guide
- Solo Ads Performance Benchmarks Explained (2026)
- Solo Ad Vendor Conversion Rate Benchmarks: 2026 Guide
Want Verified Traffic Without the Guesswork?
PulseTraffic screens every seller, filters bot clicks in real time, and shows you verified buyer traffic labels before you spend a dollar.